Sunday, April 28, 2013

Google Adsense introduced new ad unit 970 x 90 Super Leaderboard


Google Adsense introduced new ad unit 970 x 90  also known as super leaderboard for every bloggers and webmasters to earn more. The new ad unit will fit your entire site width and now it shows text ads only even you have enabled rich media ads.


Google says:
970×90 ad units are a newly adopted IAB standard and are also known as ‘super leaderboards’. This larger ad size is another visually impactful placement for advertisers to promote their products and services even on wider screens.
Please note that since the 970×90 unit is new to our network, you’ll currently see mainly text ads appearing in this format. The new super leaderboard ad unit can show up to four text ads organized in a column layout but, as with other ad sizes, the number of text ads per unit may vary per impression. When enabling image and rich media ads for this unit, display ads in the size of a 728×90 unit will be displayed initially. Over time, we expect that the inventory of image and rich media ads for the 970×90 will grow and you’ll see more full-size display ads being served.

How to Add Adsense Super Leaderboard 970X90 Ads Unit to your website :

  • Just Login to your Google Adsense Account And create a My Ads tab .
  • Click “New Ads Unit” and then select the 970X90 ad size (Large Leaderboard).
  • Make sure to customize it according to your web design.
  • Means matching colors according to your content to get more clicks and revenue.


So now remember you still have that 3 ad unit per page limitation, so you would not be able to use this ad unit as a 4th one but you can replace an older ad unit with this new one. So just visit your AdSense account and under My Ads create a new 970 x 90 ad unit and copy the code to your website that it, hope you enjoy this new update from AdSense.

Tuesday, April 23, 2013

Google Adsense introduced Link Unit Ad Previews for Selected countries

Google Adsense is a #1 way to earning decent money from online with your blog and website. The company now launched new update to link unit ads, when users click on a link unit ads the new page now opens with thumbnails of the advertisers landing page.

Kwanho Lee - Software Engineer of Google said "We ran extensive experiments on this change and found that users were more likely to click on the results with thumbnail images, leading to increased publisher revenue and more conversions for advertisers."


The new update available for all Adsense users excluding these countries such as Austria, Brazil, China, Germany, Indonesia, Mexico, Pakistan, Philippines, Poland, Saudi Arabia, Switzerland and Turkey. And also Link units ad previews not available for these  site verticals.

This changes doesn't required any action from users it will be automatically updated to your site link units.

Monday, April 22, 2013

How to Install Google+ Comments to Your WordPress Blogs

Everyone knows that Blogger has released Google+ comments option to there blogs. So, if you are using wordpress platform and not blogger dont worry. In this turtorial I will tell you how to add Google+ comments to wordpress .The new Google+ comments is something like Facebook comments. By using of this new Google+ comments on your blog, you can view your blog and Google+ comments, all in one place. Read below to install Google+ comments in WordPress.

Integrating Google+ Comments into WordPress

You can add Google+ comments to not only WordPress blog, but also to any website. Here is quick trick to install Google+ comments system on WordPress blogs.  

In order to install Google+ comments on your wordpress blog manually, You need to add these codes to your theme’s comments.php.
 
<script type="text/javascript" src="https://apis.google.com/js/plusone.js"></script> <div id="plusonecomments" style="width: 600px;height: 300px;"></div> <script type="text/javascript"> window.setTimeoutundefinedfunctionundefined) { var id = 'plusonecomments'; var divWidth = document.getElementByIdundefinedid).offsetWidth; var width = !!divWidth ? Math.minundefineddivWidth, 750) : 600; var url = "<?php the_permalinkundefined); ?>"; var moderationUrl = ""; var moderationMode = "FILTERED_POSTMOD"; gapi.comments.renderundefinedid, { 'href': url, 'first_party_property': 'BLOGGER', 'legacy_comment_moderation_url': moderationUrl, 'view_type': moderationMode, 'width': width }); }, 10); </script>

  • Copy the above code and paste into comments.php.
  • That’s it, You have installed Google+ comments in your WordPress blog.

Install Google+ Comments using WordPress Plugin

Plus One Comments is an only plugin that allows you to show Google+ comments on your WordPress blog. It just replaces the default commenting system to Google+ comments on your WordPress blogs. You just need to upload the plugin to your blog plugin folder and then activate it. Follow the link given below to download Google+ Comment Plugin for WordPress blogs.
  • Download Google+ Comment WordPress Plugin.
  • Once you have installed this Google+ Comments plugin, Your blog is now ready with Google+ commenting system.
Hope this article helped you to show Google+ comments on your WordPress blogs. What’s your view on using Google+ commenting system on blogs? Please feel free to share your view on Google+ comments for WordPress by the comment box below.

Friday, April 19, 2013

How to Add Google+ Comment box to your Blogger Blogs


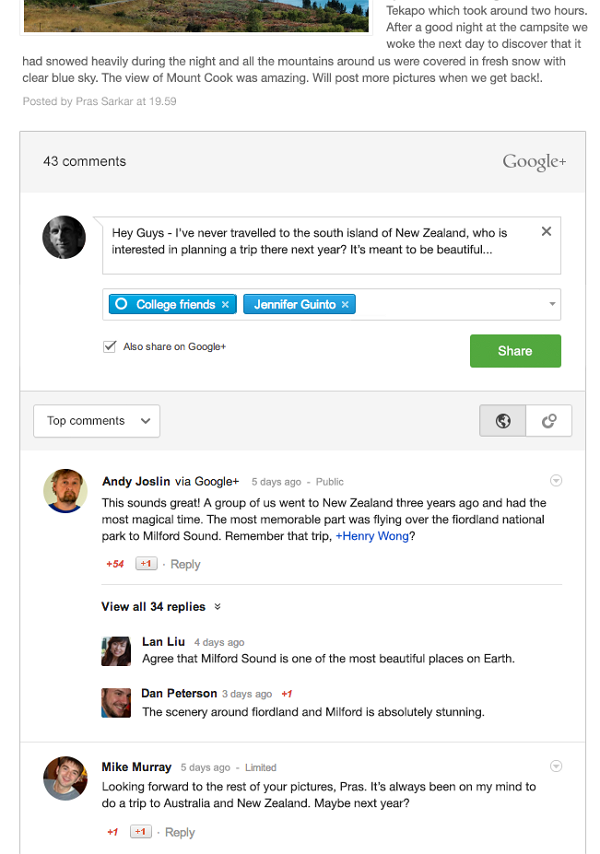
Google announced today that it brings Google+ comment box to Blogger blogs. Peoples who are using Google+  as their default instead of Blogger profile, they can add Google+ comments to their blogs. Google+ Comments look similar to traditional Blogger comments, but have some important differences. Check below to know important features of Google+ comments.

See Also: How to Install Google+ Comments to Your WordPress Blogs

Features of Google+ Comments:

  • When leaving a comment on a blog, you have an option to whether share that comment to Google+ or not.
  • Google+ posts that link to blog posts will show up as a comment underneath those blog posts
  • If comment is shared on Google+, all replies to the comment on the Google+ stream will show up in blog as a comment replies and vice versa.
  • If a comment is not shared with the blog author, the blog author will not be able to see the comment in either location.
  • As the author of a post, you’ll receive Google+ notifications when readers comment on or share your blog post.
  • Google+ posts that link to blog posts will show up as a comment.
  • You can view your blog and Google+ comments, all in one place.
  • It will helps your readers to connect with their Google circles.

How to Add Google+ Comments:

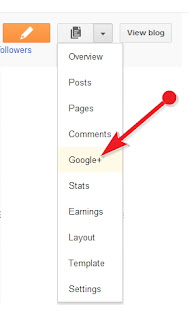
  • Go to your Blogger dashboard
  • Click on the small arrow then select Google+ in drop down menu (remember you should use Google+ as your default profile instead of Blogger profile)

 
  • Tick mark on "Use Google+ Comments on this blog" check box


Incase Google+ comments are not working on your blog, don’t get terrified because you just need to tweak your template. Go to Blogger.com >> Template >> Edit HTML >> Format Template. Now within the template coding, search for <b:if cond='data:post.showThreadedComments'> and just below it paste the following coding. Once everything is done, save the template.


<div class='cmt_iframe_holder'
expr:data-href='data:post.canonicalUrl'
expr:data-viewtype='data:post.viewType'/>

Note: If you find "<b:if cond='data:post.showThreadedComments'>" code more than once ,you need to add the above code Before all those codes.!

That's all you have successfully enabled Google+comments to your blog, that allows you to use various features of Google+ comments.Share your experiences whether you liked the new comment box or not with me and others by commenting below.


Wednesday, April 10, 2013

Blogger template HTML editor has been updated

Whether you’re a web developer who builds blog templates for a living, or a web-savvy blog owner who prefers to make changes to your template using HTML, CSS or JavaScript, you may be interested in some enhancements that blogger made to Blogger’s Template HTML Editor.

Your blog’s HTML template is the source code that controls the appearance of your blog. This template can be customized to appear however you’d like. The improved HTML template editor now supports line numbering, syntax highlighting, auto-indentation and code folding to make editing your template much easier.

Suppose we wanted to move the date of a blog post underneath the post title. To do this, follow these steps:


1.Click the “Template” tab on the Blogger dashboard, then the “Edit HTML” button, to see the new template HTML editor:


2.Locate the “Blog1” widget quickly using the new “Jump to widget” drop down:

3.This widget controls how your blog posts are displayed. The code inside the widget is folded by default. Clicking the new fold markers ‘►’ next to the line numbers expands the widget and reveals a set of “includable” tags:


4.Inside the “main” includable is the block of code that renders the post date:


5.Cut the post date code section and move it to where we want it, in this case, under the post title in the “post” includable:


6.To check our changes, click the new “Preview template” button to see the updates:


7.The post date is exactly where we want it, so tab back to “Edit template”, hit “Save template” and we’re done!

Finally, blogger has added a “Format template” button that automatically cleans up the indentation of

the template, and made it possible to search for text by pressing “Ctrl+F” once you’ve clicked into the

editor.

To find and replace text occurrences one by one, use “Ctrl+Shift+F” or to find and replace all

occurrences at once, use “Ctrl+Shift+R

Sunday, April 7, 2013

Google PageRank Update Schedule 2013


The incoming links towards a website or blog determine its success in the SERPS and increases its trust in the eyes of Google.  Each website is ranked on the basis of quality incoming links and this Rank is known as PageRank. This is a very old algorithm and I don't think I need to explain it as you all would be familiar with it. I guess you all know the benefits of a higher Google Page Rank in Promotion of any website.

This is the reason behind webmasters always keeping one eye on Google PageRank update. Google doesn't do it on regular basis. Neither there is a fixed time for this. There is no one who can tell exactly when next Google PageRank update will take place. Google keeps few things hidden and you never get the idea behind why Google does this
 

As per expected, on November 2012 Google PageRank update took place. Keeping this in mind that, PageRank updates took place on May 2012 then August 2012 and then November 2012 so I have came to the conclusion that Google is rolling out these updates. So now according to my calculation, I have developed a list for PageRank Update schedule for 2013. 

Google PageRank update schedule for 2013,

First PR Update January 31 - February 1st Week
Second PR Update June 28 - July 1st Week
Third PR Update September 28 - October 1st Week or Earlier
Fourth PR Update December 15 - January 1st Week or Later

These are just roughly calculated by me. The PageRank Updates might take place between these dates or earlier or later. We can’t say anything right now because Google never does things on time!

Wednesday, April 3, 2013

Top 4 Facebook Smooth jQuery Static POP OUT likebox widget generator for blogger blog

I had developed a Facebook Static popout jquery effect Like box generator for you.This Widget Generator let's you easily generaate your favorite Facebook style Widget and also easily add to your Blogger Blog.Use this Widget generator and Enjoy..!

Add jQuery plugin (if your blog have a jquery plugin ignore this step)

  • Go to Design->Edit HTML[Template->Edit HTML in new blogger interface]
  • Copy below code inside <head>
<script src='http://ajax.googleapis.com/ajax/libs/jquery/1.7.1/jquery.min.js' type='text/javascript'/>

Add the Widget To Your Blog

  • Go to Design-> Page Elements
  • Click add gadget and select HTML/javascript
  • Copy and paste the generated code inside it and save it.