Showing posts with label how to. Show all posts

Sunday, November 17, 2013

How to Embed Social Media posts to your blog or website

How to Embed Social Media posts to your blog or website
Social media sites offers various features including Embed feature for users to connect with peoples from across the World. With this feature users can add their social media posts including pictures, videos, hashtags and other content directly to their blog and website. Embed posts can be seen by anyone even if they not having such social media account.

How To Embed Tweets:

To embed your Twitter tweets to you blog please follow the below steps
  • Sign in to your Twitter account 
  • Click on the down arrow button of a specific post, which you want to add to your blog post.
  • Embed Tweets

    • Then click Embed Tweet button in drop down menu
    • Next a pop-up window will open and show Embed code of the specific post 
    • Just copy and paste the code in your your blog post. 

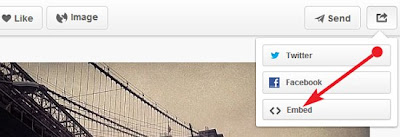
    How to Embed Facebook Posts:How to Embed Facebook Posts

    • To Embed Facebook post to your blog, first check the post should be shared public. You can know that by hovering your mouse cursor over the audience selector (you'll see a globe icon).
    • Then click the Menu  icon in the top right of the specific post and select Embed Post in drop down menu
    How to Embed Facebook Posts
    • Now the dialogue box shows the two lines of HTML code, just copy the code and paste it to your blog.

    How to Embed Google+ Posts:

    • Sign in to your Google+ account
    • Click on the menu icon of the specific post which you want to embed
    • Then choose Embed post option in drop down menu
    •  A dialog box displays with embed code that you can copy and paste into your site.
    How to Embed Google+ Posts

    How to Embed Pinterest Posts:

    • Open Pinterest.com and sign in to your account
    • Click on a specific pin which you want to Embed, then click the Menu button in top of the pin
    • Then select Embed option
    • How to Embed Pinterest Posts
    • Then copy the embed code to your blog or website. 
    Thursday, May 16, 2013

    How to Add Wikipedia Search Box to Blogger

    Wikipedia Search Box For Blogger
    Wikipedia Search Box for Blogger - Isn't it cool? In this article below, I have shared How to add Wikipedia Search Box to Blogger (BlogSpot) blog. Blogger has recently launched a new official widget to its Gadget Gallery as Wikipedia Search Box. Wikipedia Widget/Gadget allows you to insert a Wikipedia search box into your Blog. You can add this Wikipedia Search Box to your blog sidebar, header and Footer. So if you are looking for adding a Wikipedia search box to your blog, Here is a quick guide on how to add Wikipedia search to Blog.

    No doubt, Wikipedia is the second top most popular search website in the world. And it is always a good idea to add best search engine box to Blog or website. Since if your are running an informative Blog, you must add Wikipedia search box to your blog. There are many benefit of adding Wikipedia Search to your blog. This Wikipedia Search box will help your blog reader to search Wikipedia articles without leaving your blog. And this is how you can stop your blog reader on your blog for some more time, that helps you to decrease your Blog Bonus rate too. Let’s start adding Wikipedia Search box to Blogger blog.

    Wikipedia Search Box for Blogger

    So if you are ready to add Wikipedia search to your Blog. Adding Wikipedia search box to your blog/website is so easy, you just need to add a new Gadget to your Blog in the form of Wikipedia. However follow the instructions given below for adding Wikipedia Search Box to Blogger.

    Adding Wikipedia Search Box to Blogger

    As you are a Blogger user for a long time, you probably would have know How to add widget to Blogger’s blog. But if you are new to Blogger, don’t worry it’s too easy to add new widget to Blogger.
    • Simply Go to Blogger>> Your Blog>> Layout>> Add Gadget>>More Gadgets.
    • A Pop-up box will open, Now find Wikipedia search widget.See the picture below for reference.
      Wikipedia Gadget
    • Now click on this widget and give a title (optional) and hit Save button.
    • Now drag this widget where you this widget to show i.e. Sidebar, Header and Footer.
    Congratulations! You have successfully added Wikipedia Search box to your blog. Now check your blog, This Wikipedia Search box widget will looks like this.
    Demo of wikipedia search box in blogger
    Hope you like this tutorial to add Wikipedia Search to Blogger. What is your view about this new Wikipedia search box for blog. Share your view via comment box below.

    Monday, May 13, 2013

    4 Best Tools to Run Giveaways & Promotions on your Blog and Website

    Here I listed 4 best web apps to create entry form for giveaway and online promotions, it helps to increase your blog community and social media subscribers. With these app you can easily manage your giveaway and also you can select random winners.

    1. Giveaway Tools

    Giveways Tools is one of the best web application that allows users to create embeddable entry-form to run Giveaways and Promotions on your blog. You can create and stunning giveaways with following subscription features. It is featuring auto-verification through third-party APIs.

    Giveaway Tools

    Features:

    • Blog Comments
    • Etsy - Favorite An Item
    • Etsy - Favorite A Seller
    • Facebook - Like A Page
    • FeedBurner - Email Subscription
    • Pinterest - Pin Something
    • Pinterest - Follow A Board
    • RSS Subscription
    • Twitter - Follow
    • Twitter - Tweet
    • Voting For Blog

    2. Punch Tab

    Punch Tab is an another best tool to run giveaways on your blog, websites and Facebook pages. With Punch Tab you can set 9 different ways to users for entering your giveaway. 
    Punch Tab

    Features:

    • Twitter - Follow
    • Twitter - Tweet
    • Facebook - Become fan
    • Facebook - like
    • Google+1
    • Blog Comment
    • Question
    • Visit
    • Download

    3. Rafflecopter

    Rafflecopter allows you to customize and embed an entry form on your site for promotions and giveaways. It automatically select random winners, and it allows to download all your subscription details as spreadsheet.

    Rafflecopter             

    Features: 

    • Build your email lists
    • Facebook Fan & Like
    • Twitter Follow & Tweet
    • Pinterest Follow & Pin
    • Facebook app to run giveaways on Facebook page
    • Instant Random Winners and more

    4. Wildfire App

    Wildfire one of the best web application to create giveaways and promotions. It is owned by Google and it is available only  in premium version. It allows to Run any kind of promotion, contests, sweepstakes, coupons, giveaways, and others.

    Wildfireapp

    Features:

    • Real Time analytics
    • Fast and easy
    • Social media subscription option available for Facebook, Twitter, LinkedIn, Google+, Pinterest and YouTube.
    • It allows user to create Sweepstakes, Coupons, User-Generated Photo, Essay, Video Contests, Pick your Favorites, Quizzes and Trivia

    Tuesday, December 11, 2012

    How To Put Your Blog Name In "AddThis" Menu?

    AddThis is a great social share widget that contains links to over 350+ social media networks where visitors can share your blog post with friends and can also bookmark it. You can in fact customize the  AddThis menu by putting your website name in it and you can also change its background colour. This will help users know that they are using a service you approve of, and this will help encourage more use of this great tool. The more shares your post receives the better the page views.


    Adding AddThis Button To Blogger

    You can add different styles of add this widgets to your blog by visiting the AddThis website. We later will learn how to put your blog name in it and change the background color. Kindly get your AddThis code and then follow the steps below to add your AddThis button to blogger.
         1. Go To Blogger > Design > Edit HTML
         2. Backup your template
         3. Check the "Expand Widgets Templates" Box
         4. Search for <data:post.body>
         5. To add the AddThis button below post titles then add your addthis code above <data:post.body> else paste it below it so that the button may appear at the bottom of your posts.
         6. Save your template and you are done!


    How To Customize The AddThis Menu?

                    1. Go To Blogger > Design > Edit HTML
                    2. Backup your template
                    3. Search for </head>
                    4. Just above it, paste the following code,
    <script type='text/javascript'>
    var addthis_config = {
         ui_cobrand: &quot;BLOGG-TRICKS&quot;,
    ui_header_color: &quot;#ffffff&quot;,
         ui_header_background: &quot;#0080FF&quot;
    }
    </script>
    • Replace BLOGG-TRICKS with your blog name
    • Replace #ffffff with Font Color. Our Color Generator tool can help you.
    • Replace #0080FF with your preferred background color.
                   5.  Save your template and see the branded change. Enjoy! :>

    Sunday, December 9, 2012

    How to Add Retweet Button to your Blogger Posts

    Since Twitter is getting huge popularity these days, adding a cool Retweet Button to your Blogger blog posts can easily get you some decent amount of traffic and promote your content/products to large people in quick time. If you have tons of followers, then you can easily milk it.. ;)

    So, here is how to add a nice Retweet button to your blogspot blog posts:

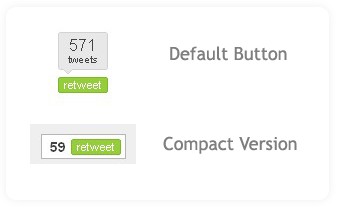
    There are two versions of retweet buttons.. one is the default one (looks like digg button) and the other one is Compact version which can fit in small space..

    twitter retweet button for blogger


    The Code for the Default version is :


    <script type="text/javascript">
    tweetmeme_url = '<data:post.url/>';
    </script>
    <script type="text/javascript" src="http://tweetmeme.com/i/scripts/button.js"> </script>

    and for Compact version is :


    <script type="text/javascript">
    tweetmeme_style = "compact";
    </script>
    <script type="text/javascript" src="http://tweetmeme.com/i/scripts/button.js"></script>


    Here is how to add them to your blogger post..

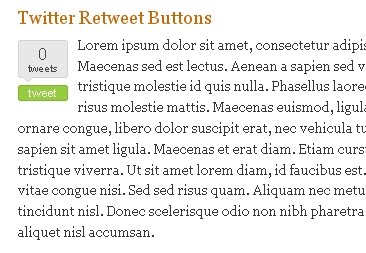
    If you want it to the left side of blog post..

    twitter retweet button aligning left

    Find


    <data:post.body/>

    And Paste this code BEFORE that line..


    <div style="float:left;padding: 6px 10px 6px 0px;">
    <script type="text/javascript">
    tweetmeme_url = '<data:post.url/>';
    </script>
    <script type="text/javascript" src="http://tweetmeme.com/i/scripts/button.js"> </script>
    </div>

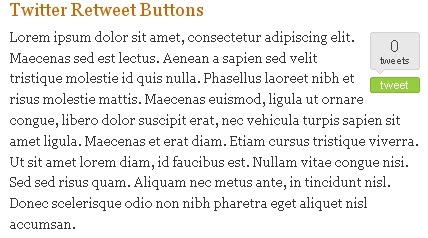
    If you want it to the Right Side of post..

    adding retweet button on the right side of blog post

    Find


    <data:post.body/>

    Add this code BEFORE that line..


    <div style="float:right;padding: 6px 0px 6px 6px;">
    <script type="text/javascript">
    tweetmeme_url = '<data:post.url/>';
    </script>
    <script type="text/javascript" src="http://tweetmeme.com/i/scripts/button.js"> </script>
    </div>


    Note: In the above two cases, if you want Compact button instead of default style, Just simple replace the default style code with compact one (refer step 1)

    Finally SAVE THE CHANGES!

    How to add Blogger Share Buttons to Custom Blogger Templates

    Recently, Blogger released their new Share Buttons feature which makes it easier for your Blog visitors to bookmark, tweet, fshare, email ,etc your post.

    But, if you're using any custom blogger template.. you may not see the widget appearing in blog..even though you activate it.

    So, if you have that problem. here is how to fix it.
    (before making any changes..first backup your template)

    1. Sign into Blogger > Design > Edit html
    (tick the expand widget templates)

    2. Add this line anywhere you want the widget to appear

    <b:include data='post' name='shareButtons'/>


    Normally, in most templates, you can add it after this line..

    <p class='post-footer-line post-footer-line-1'>


    If you don't find that above line in your template....
    Find this one.

    <p><data:post.body/></p>
     
    and add this code after that line..

    <p><data:post.body/></p>
    <div style='clear:both; padding: 10px 10px 10px 10px;'> <b:include data='post' name='shareButtons'/> </div>


    Note: If you're using Magazine style blogger template, You can find the data:post.body line TWO TIMES.. So, try in both ways and find out which one is working..and remove the other one.

    Finally..Save the template!

    If you still don't see it in your Blog, Make sure..you activated it by going to
    Blogger dashboard > Design > Click the 'edit' button of the Blog post section.


    Tuesday, November 27, 2012

    How to Create a Stickybar with "Close Button"?

    The Stickybar or fixed Bar that we released was warmly welcomed. What we all have been searching for was a Close Button or Cancel button that would hide the bar display. May be not every visitor enjoys viewing that fixed bar at the top, so they deserve to be provided with an option to view or hide the bar. While viewing one of the Wordpress Blogs I found this button next to their updates bar. I managed somehow to fetch the script half broken. Making it work with blogger template was difficult because blogspot templates are programmed via XML and the rules of XML are really harsh when it comes to Character case. Debugging the script was difficult but Alhamdulillah the hard work paid off. You can see it Live just to the right of my Stickybar at the top. I am excited to share it with you all. Lets get to work!

    Create a Sticky Bar With Close Button in  Blogger

    Follow these easy steps:
         1.   Go To Blogger > Design > Edit HTML
         2.   Backup your template
         3.   Search for this
    ]]></b:skin>

        4.   Just above it paste the following CSS code,
    #mbt_bar{
    background:#333 url('https://blogger.googleusercontent.com/img/b/R29vZ2xl/AVvXsEhAiO5JnqXUX4le1vnbZmDPX824GwdFtouDafrbksnO51OgFauvr39zFGxeTFYn9NCyNvyJtcTC4uSc0zvLGs6D2fj7N0yFStxvztQuXYJps9g8IDgGDTjXWAylcXlwcs0a7bUtKC1BiIo/s400/stickybar.png') repeat-x;
    width:100%;
    margin:0 auto;
    text-align:center;
    padding:0px 0;
    border-bottom: 1px solid #888888;
      -moz-box-shadow: #666666 0px 1px 3px;
      -webkit-box-shadow: #666666 0px 1px 3px;
      box-shadow: #666666 0px 1px 3px;
      z-index: 999;
    height: 28px; position:fixed;
    line-height: 1.85em;
    vertical-align: baseline;
    letter-spacing: 1px;
    color:#fff;
    font-size:13px;
    font-weight:bold;
    font-family: arial,"Helvetica",sans-serif;
    }
    #mbt_bar a{
    text-decoration:underline;
    color:#E2E504;
    }
    #mbt_bar a:hover{
    text-decoration:none;
    }
    #mbt_bar p {margin:0; list-style:none;}
    #mbt_bar img {vertical-align: middle;
          margin-right: 6px;}

        5.    Next search for </head>   and paste the following Javascript code just above it

    <script type='text/javascript'>
    //<![CDATA[
    var mbt_arr = new Array();
    var mbt_clear = new Array();
    function mbtFloat(mbt) {
    mbt_arr[mbt_arr.length] = this;
    var mbtpointer = eval(mbt_arr.length-1);
    this.pagetop = 0;
    this.cmode = (document.compatMode && document.compatMode!="BackCompat") ? document.documentElement : document.body;
    this.mbtsrc = document.all? document.all[mbt] : document.getElementById(mbt);
    this.mbtsrc.height = this.mbtsrc.offsetHeight;
    this.mbtheight = this.cmode.clientHeight;
    this.mbtoffset = mbtGetOffsetY(mbt_arr[mbtpointer]);
    var mbtbar = 'mbt_clear['+mbtpointer+'] = setInterval("mbtFloatInit(mbt_arr['+mbtpointer+'])",1);';
    mbtbar = mbtbar;
    eval(mbtbar);
    }
    function mbtGetOffsetY(mbt) {
    var mtaTotOffset = parseInt(mbt.mbtsrc.offsetTop);
    var parentOffset = mbt.mbtsrc.offsetParent;
    while ( parentOffset != null ) {
    mbtTotOffset += parentOffset.offsetTop;
    parentOffset = parentOffset.offsetParent;
    }
    return mbtTotOffset;
    }
    function mbtFloatInit(mbt) {
    mbt.pagetop = mbt.cmode.scrollTop;
    mbt.mbtsrc.style.top = mbt.pagetop - mbt.mbtoffset + "px";
    }
    function closeTopAds() {
    document.getElementById("mbt_bar").style.visibility = "hidden";
    }
    //]]>
    </script>
       6.     Finally search for <body>  and just below it paste the following HTML code
    <div id='mbt_bar'> WRITE YOUR TEXT HERE <span style='padding:0px; float:right'>
    <img align='absmiddle' border='0' onClick='closeTopAds();return false;' src='https://blogger.googleusercontent.com/img/b/R29vZ2xl/AVvXsEiPT0OS6Im7Ekh0rJ_zlciOTQcer3x0ES5KZHjiBV_jPk3dxuY9BeHmsIZvmKKsdBWRyByxu7v1MgFy6GQLONTetQeSNWYw9CAiC5WD5div8DwTedt6b4kTjsd7TbudPqwXH0HpzqunLjs/s400/cancel.png' style='cursor:hand;cursor:pointer;'/></span></div>
    <br/><br/>

        To write an announcement, update news or notice to readers, just replace the yellow highlighted text with your message. If you wish to change the Close button image then simply replace the bolded black link with your button's link.
        7.     Save your template
        8.     You are all done!
    Visit your blog to see it fixed to the top just beautifully with a close button waiting to be clicked!

    How it works?

    The close button when clicked triggers the function closeTopAds();  which then searches for function definition. The function is defined such that it sets visibility of bar to hidden. That's how the bar hides once the button is clicked and reappears only upon page refresh. Indeed a pretty neat way to make a user friendly bar.

    Monday, November 19, 2012

    How To Submit Blogger Sitemap To Google Webmaster

    Google is the most popular search engine and number of webpages indexed by Google is uncountable. To make Google find, index and rank your site you need to submit your sitemap of your site to Google Webmaster Tools. Google Webmaster is a good SEO tool to use. You could also keep track of your sites statistics with the help of Google Webmaster Tools. As a new blogger you may not know how to submit your blogger sitemap to Google Webmaster Tools. Here I am to help you.


    Steps To Submit Blogger Sitemap To Google Webmaster:-

    1) Go to http://www.google.com/webmasters/

    2) Sign in to Webmaster Tools with your gmail id and password


    3) You can see now a thumbnail and a link of your site. Click on the anyone of them to go to Dashboard of Webmaster Tools.


    4) Click on Sitemaps


    5) Click on ADD/TEST SITEMAP

    Use Sitemap Generator Tool to generate your sitemap

    Copy and paste the url of your sitemap in the space provided.


    6) Click on Submit Sitemap and refresh the page

    Your webpages are submitted and waiting to be indexed.

    When you login to your Google Webmaster days later, you should be able to see the indexed pages and statistics of your blogger.

    Wednesday, October 24, 2012

    How To Create Wordpress Subscription Form?


    This Widget Was Created by
    It's a long time since we last released a widget. The widget today is really a useful one. It is a smart container which displays the total number of subscribers, contains RSS link, Facebook link and Twitter link. It also contains a beautiful subscription form where visitors can submit there emails to receive free website updates. This Widget is made Compatible to work with all browsers especially with IE8.
    I named it Wordpress Subscription Form because you might have seen such widgets on every Wordpress blog and Blogger lacks it.

    How To Create Wordpress Subscription Form?

    The steps are made really simple. Follow these,
    1. Go To Blogger > Design
    2. Select an HTML/JavaScript Widget
    3. Paste the code below into the widget

    <style>.mbtbar{width: 100%; float: left;}.mbtbar .count{color:#333; font-size: 14px; font-weight: bold; font-family: Helvetica, Arial; background: #fff; height: 45px; line-height: 45px; vertical-align: middle; width: 100%; padding: 0 10px 0 4px;}.mbtbar .count span.bigcount{color:#F17C18; font-size: 24px; font-family: Helvetica, Arial; line-height: 39px; vertical-align: top; padding-right:3px;}.mbtbar .subicons{border-bottom: 1px solid #e6e6e6; margin: 0px 0 0px 0; float: left; width: 300px; font-family: Helvetica, Arial; font-size: 14px;} .mbtbar .subicons a{text-decoration: none; color:#333333;} .mbtbar .subicons a:hover{text-decoration: underline; color:#333333;}.mbtbar .subicons .rssicon{border-right: 1px solid #e6e6e6; background: url(https://blogger.googleusercontent.com/img/b/R29vZ2xl/AVvXsEiP6GAIXtfcciqSIA_bw12Q6YXmYKrdGHceftVHc0SX-SeaGQC5j3WL7iwaaEaVpregH6lwKRXDjjEro2UM1vshLcsfSaQpBskppL0fW0nWhlOidbzJb764hKFtS9n5nireT33mXGMgLDE/s400/rss.png) no-repeat left center; min-width: 20px; height: 48px; line-height: 57px; vertical-align: middle; float: left; padding: 0px 20px 0px 30px; margin: 0 0 0 5px;}.mbtbar .subicons .fbicon{border-right: 1px solid #e6e6e6; background: url(https://blogger.googleusercontent.com/img/b/R29vZ2xl/AVvXsEjmOLrS2Q-fuhlq66zeDjlfRKsTRtrmctE5ktbUBh0Rf3KhxC_RB0OUyj2rgonc4yB52c_oVawBmg7GWg50jxpBIFoFjiBtW_-GWOga8-sdWypnyMs92aLJJg6Da6o9WZyBNR_3-_mQRE8/s400/facebook.png) no-repeat left center; min-width: 20px; height: 48px; line-height: 57px; vertical-align: middle; float: left; padding: 0px 20px 0px 30px; margin: 0 0 0 5px;}.mbtbar .subicons .twittericon{background: url(https://blogger.googleusercontent.com/img/b/R29vZ2xl/AVvXsEjKl-_RSezq6078h4TEou9DIWR6epWMToKTtdhXwOiUURkuWc4kK9pyJfM-RGa5dleRifmq6an4zG1rURP0Rugb82xxHOvj57_AaR1LMZMFSX6yi4gBKdNEGTbs2qSXhQgawuZ3k1d71V0/s400/twitter.png) no-repeat left center; min-width: 20px; height: 48px; line-height: 57px; vertical-align: middle; float: left; padding: 0px 20px 0px 30px; margin: 0 0 0 5px;}.mbtbar .emailsub{border-bottom: 1px solid #e6e6e6; padding: 15px 0 20px 0; float: left; width: 100%; font-family: Helvetica, Arial;}.mbtbar .emailsub .emailicon{background: url(https://blogger.googleusercontent.com/img/b/R29vZ2xl/AVvXsEilr3S4O-h-Bd5KS51jP-7sRecGesOMHlhV2f22z0kmbH9jxDKNrzCGzmUPWW8OgbYVSuuGggaajfKVzijim052Y-51thERsArrXaOf9Sec0vXhLx8abe8rnHfBzdpP6V2p9tHVPcblls0/s400/email.png) no-repeat left center; float: left; padding: 5px 15px 0px 35px; margin: 0 0 0 5px; width: 300px; height: 28px; line-height: 28px; vertical-align: middle; font-size: 14px; color: #333; }.mbtbar .emailsub .emailupdatesform{margin: 15px 0 5px 5px; width: 300px; float: left;}.mbtbar .emailsub .emailupdatesform input.emailupdatesinput{background: #fff !important; float: left; border: 1px solid #d2d2d2; padding: 0px 8px 0px 8px; color: #a19999; font-size: 12px; height: 25px; width: 200px; -moz-border-radius: 5px; -webkit-border-radius: 5px;}.mbtbar .emailsub .emailupdatesform input.joinemailupdates{background:-moz-linear-gradient(top,#57ABFE  0%,#0080ff  100%); background:-webkit-gradient(linear,left top,left bottom,from(#57ABFE ),to(#0080ff )); border: 1px solid #0080ff ; text-transform: uppercase; color: #fff; height: 25px; padding: 0 12px 0 12px; margin: 0 0 0 5px; -moz-border-radius: 5px; -webkit-border-radius: 5px;} </style><!--[if IE 7]> <style> .mbtbar .count span.bigcount{color:#F17C18; font-size: 24px; font-family: Helvetica, Arial; line-height: 34px; vertical-align: middle; }.mbtbar .emailsub .emailupdatesform input.joinemailupdates{background:#0080ff ; border: 1px solid #0080ff ; text-transform: uppercase; color: #ffffff; font-weight:bold; height: 25px; padding: 0 12px 0 12px; margin: 0 0 0 5px; } </style> <![endif]--><div class="mbtbar"><div class="count">Join <span class="bigcount">feed count </span> People Following blogg-tricks</div><div class="subicons"><div class="rssicon"><a href="http://www.blogg-tricks.com/feeds/posts/default " target="_blank">RSS</a></div><div class="fbicon"><a href="http://www.facebook.com/p.harieksh " target="_blank" rel="nofollow">Facebook</a></div><div class="twittericon"><a href="http://twitter.com/harikesh409 " target="_blank" rel="nofollow">Twitter</a></div></div> <div class="emailsub"> <div class="emailicon">Stay Updated via Email Newsletter</div> <div class="emailupdatesform"> <form action="http://feedburner.google.com/fb/a/mailverify" method="post" target="popupwindow" onsubmit="window.open('http://feedburner.google.com/fb/a/mailverify?uri=blogg-tricks ', 'popupwindow', 'scrollbars=yes,width=550,height=520');return true"><input gtbfieldid="10" class="emailupdatesinput" name="email" value="Enter your email..." onblur="if (this.value == &#39;&#39;) {this.value = &#39;Enter your email...&#39;;}" onfocus="if (this.value == &#39;Enter your email...&#39;) {this.value = &#39;&#39;;}" type="text" /><input value="blog-tricks " name="uri" type="hidden" /><input value="Join" class="joinemailupdates" type="submit" /></form></div></div></div>
       4.  Save the widget and you are done! 

    How To Style and Edit the Widget?

     Follow these,
    • To Change the the Blue Colour of the Submit button Change #57ABFE to a Light shade and this #0080ff to a dark shade. Our Colour Generator Can help in this case.
    • Replace feed count with your Feed count and always update it manually once a week. To change its colour edit this #F17C18 
    • Replace http://www.blogg-tricks.com/feeds/posts/default with your feedburner RSS Feed link.
    • Replace http://www.facebook.com/p.harieksh with your Facebook profile  Link
    • Replace http://twitter.com/harikesh409 with your twitter profile link
    • Replace http://feedburner.google.com/fb/a/mailverify?uri=blogg-trickswith your feedburner RSS Email Link
    • Replace blogg-tricks with the Feedburner RSS Email Title which is always written at the end of your FEED Email Link as shown below,
    http://feedburner.google.com/fb/a/mailverify?uri=blogg-tricks  

    I would be really pleased to hear about your suggestions and feedback. If you faced any trouble then do not panic and let me know :>


    Wednesday, October 17, 2012

    How to install blogger template 2012

    In this tutorial i am going to show you how to install blogger template in the new updated version of the blogger.
    just simple follow the step and install a blogger template in updated blogger interface.

    1. Login to your blogger account

    2. Now just select Template and you can see bellow button at the right hand side

     3. Now just click on backup / restore button and one box will pop up (you can see it in bellow snapshot)


    4. Now simply browse your template and click on upload and you have done !
    You can also change the arrangement of the widgets using layout.

    Saturday, October 13, 2012

    How to download and restore and your blog template in the new Blogger

    It is important to backup your blog's template before you make any changes to it.

    If you are still using the old interface, visit this link:
    Backup your template in old Blogger interface


    Steps to download your Blogger's blog template:
    1. Click on the Template link in the left navigation menu.


    2.Click on the Download full Template to save your template in xml format.

    Steps to restore your Blogger's blog template:
    Click on Browse an select your previously saved template and press the Upload Button.