Sunday, December 23, 2012

Mybloggertricks(MBT) like blogger comment(Expand/collapse)

Implementing Jquery Toggle Effect

1. Go to blogger dashboard --> Template --> Edit Html ( Tick the Expand widget Template option).
2. Find for <head> tag and place the following peace of code just below it.
<script src='http://ajax.googleapis.com/ajax/libs/jquery/1.7.1/jquery.min.js' type='text/javascript'/>
<script type='text/javascript'>
$(document).ready(function(){
$(&quot;.toggle_box&quot;).hide();
$(&quot;h3.expand&quot;).click(function(){
$(this).toggleClass(&quot;active&quot;).next().slideToggle(&quot;slow&quot;);
});
});
</script>
h3.expand is the class for your comment form headline that expands the contents[toggle_box] upon the mouse click on it.
Here toggle_box is the class of your comment form contents i.e., the content that should be displayed when expanded.

Style for toggle element and its content box

3. Now find(Ctrl+F) for ]]></b:skin> and place the following peace of style code just above it.
/*----- Toggle Comment Form by http://blogg-tricks.blogspot.com ----*/
h3.expand {
background: url(https://blogger.googleusercontent.com/img/b/R29vZ2xl/AVvXsEidckZ-mUsaLy6k9Q-Qkq-pi5g9tGlcpIBNb2An1A23LncRSz7RheiRUXOjUVa8Bf4mVPeKyf4HXvpKqGp9s0Njl8iFmuhshB5xFPVn_ZsN-Sf_ST1oyaERbaMJF3PRYq586x8bsJ_CJ4c/s1600/comment-boxbg.png) no-repeat;
height: 44px;
line-height: 46px;
width: 518px;
font-family:Georgia, "Times New Roman", Times, serif;
font-size: 1.4em;
font-weight: bold;
text-align:left;
border-radius:4px;
color:#A1A1A1;
float: left;
cursor:pointer;
box-shadow: #333 0px 1px 3px;
padding:0 0 0 50px;
margin:10px 0px 10px 10px;
}
h3.active {
background-position: bottom left;
color:#ddd;
}
.toggle_box {
padding-left:10px;
overflow: hidden;
clear: both;
}
The Css style for the visible,active header and the content box is specified above. You can however easily modify it as you wish.

Adding Html Code

4. Now find for the following code.
<b:includable id='comment-form' var='post'>
5. Paste the following peace of code just below it.
<h3 class='expand'>Click Here To add Comment</h3>
<div class='toggle_box'>
<div class='block'>
6. Paste two div closing tags just before its closing includable tag as shown below.
<b:includable id='comment-form' var='post'>
<h3 class='expand'>Click Here To Add Comment</h3> 
<div class='toggle_box'> 
<div class='block'>
<div id='bt-form'>
<a name='comment-form'/><br/>
<h4 id='comment-post-message'>
<p><data:blogCommentMessage/></p>
<data:blogTeamBlogMessage/>
<a expr:href='data:post.commentFormIframeSrc' id='comment-editor-src'/>
<iframe allowtransparency='true' class='blogger-iframe-colorize' frameborder='0' height='275' id='comment-editor' scrolling='no' src='' width='580px'/>
<data:post.iframeColorizer/>
</div>
</div> 
</div>
</b:includable>
 7. Finally Save your template and view your comment form.

CoolMax


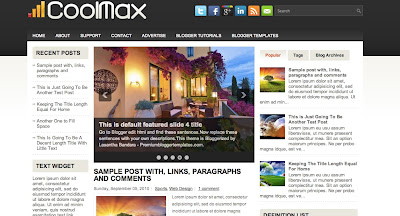
This Is a Three Column Blogger Template with a Left-Right Sidebar.The Template Colors Are mainly White, Black and Grey.The Templates Features Include Web 2.0, Adapted from word press, elegant, fresh, magazine, cool, fixed width, left sidebar, right sidebar, featured section, slider, three column footer, tabbed widget and top navigation bar .

Author Name and URL : Lasantha Bandara
Original Designer URL : http://fthemes.com/coolmax-free-wordpress-theme/

Template Help And Installation :

1. How to Install Blogger Template
2. Customize your template
3. How to Use This Template and customizations to be done 

Configure Meta tags
Login to your blogger dashboard--> layout- -> Edit HTML.Now Scroll down to where you see below codes :

<meta content='DESCRIPTION HERE' name='description'/>
<meta content='KEYWORDS HERE' name='keywords'/>

Replace DESCRIPTION HERE,KEYWORDS HERE as below.
DESCRIPTION HERE:Write your blog description
KEYWORDS HERE:Write the keywords of your blog separated by comma.

How To Configure Favicon:
 
Login to your blogger dashboard--> layout- -> Edit HTML.Now Scroll down to where you see below code :
<link href='YOUR-FAVICON-URL' rel='shortcut icon' type='image/vnd.microsoft.icon'/>

Now replace "YOUR-FAVICON-URL" with your Favicon address/url.

Configure Featured Content Slider:

Login to your blogger dashboard--> layout- -> Edit HTML.Find <!-- Featured Content Slider Started -->.Now scroll down slowly and you can see each featured slide codes between <div class='fp-slides-items'> and </div> .
Now replace,
  • "This is default featured post X title" with your featured post title.
  • "#" with your featured post URL.
  • "Go to Blogger edit html and find these sentences.Now replace these sentences with your own descriptions.This theme is Bloggerized by Lasantha Bandara - Premiumbloggertemplates.com." with your slider description.
  • Slider image address with your slider image.
for each featured slide.

How To Change Tab Names of Tab Widget
If you want to change your tab names of your tab widget then find this:

<ul class='tabs-widget tabs-widget-widget-themater_tabs-1432447472-id'>
<li><a href='#widget-themater_tabs-1432447472-id1'>Popular</a></li>
<li><a href='#widget-themater_tabs-1432447472-id2'>Tags</a></li>
<li><a href='#widget-themater_tabs-1432447472-id3'>Blog Archives</a></li>
</ul>

Now change the names "Popular", "Tags" and "Blog Archives" as you like.

How To Add a Header Logo

You can add a header logo for this template easily in the "Page Elements" section(Blogger Default Method).Logo image size must be 342px width and 54px height.
If you have any problem regrading this template,leave a comment below.
Important !!!:
Please do not remove the footer credit. I spend several hours to create this blogger template. So that you can use it for your blog. All I ask is, stay the credit intact.


Tequilas - Photo Blog Black Template


Style - This is a four column template suited to Photography blogs or blogs with subjects repesented by images.The homepage displayes a image from each post with the title which can be clicked to see the full post.The templates uses a black color sheme and also has a four column footer section.

Designer - Be-Insight

Template Help And Installation :

1. How to Install Blogger Template
2. Customize your template
3. How to Use This Template and custamizations to be done 


Simply Delicious

Simply Delicious Is a One Column Blogger Template with No Sidebar.The Template Colors Are Bright and mainly white.The template has a minimalist design with a one column layout.The first post is large working as a featured post.Other posts are displayed by a thumbnail.You can download This One Column Blogger Template for Free from BestBloggerTemplates.Net.

Template Help And Installation :

1. How to Install Blogger Template
2. Customize your template
3. How to Use This Template and custamizations to be done 


How To Enable Threaded Comments on Blogger / Blogspot

Blogger Threaded Comments. Finally Blogger has launched new threaded comments. Threaded commenting should make it easier for you to respond to individual comments. Blogger threaded comment system is only two levels deep, meaning you can only reply to original comments, and not to comment replies . But I guess it’s a good start. Let's wait for new update from Blogger.


How To Enable Threaded Comments on Blogger / Blogspot

As mentioned on Blogger buzz official site, you have to setup your blog. “Blog Feed” set to “Full”, and are using “Embedded” comments, then you’re ready to start a discussion with your readers.

Blogger New Interface


1. Go to Dashboard , select your blog.
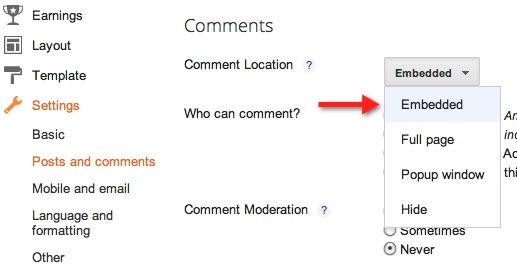
2. Go to Settings > Posts and Comments
3. Comment Location option set to Embedded


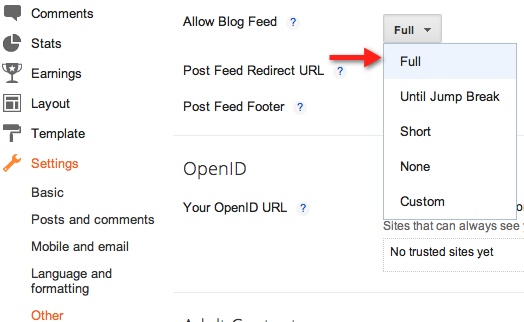
4. Go to Settings > Other
5. Allow Blog Feed option set to Full


Old Blogger Interface

1. Go to Dashboard, select your blog.
2. Go to Settings > Comments
3. Comment Form Placement option set to Embedded below post

4. Go to Settings > Site Feed
5. Allow Blog Feed option set to Full


STILL NOT GETTING THREADED COMMENTS?

If sou still not getting threaded comments, let's two alternative method for Standard Templates and Custumized Templates.

Standard Templates


1. Go to Design > Edit HTML 
2. Click on Revert widget templates to default link

You can do this step for Costumized Templates, but this will Discard the all Changes Widget and revert to Default.

Custumized Templates

1. Go to Template > Edit HTML
2. Click on Expand Widget Templates check box
3. Find the Following code
<b:if cond='data:blog.pageType == &quot;static_page&quot;'>
<b:include data='post' name='comments'/>
</b:if>
<b:if cond='data:blog.pageType == &quot;item&quot;'>
<b:include data='post' name='comments'/>
</b:if>
4. You will get two results. Replace both code with following code
<b:if cond='data:blog.pageType == &quot;static_page&quot;'>
<b:if cond='data:post.showThreadedComments'>
<b:include data='post' name='threaded_comments'/>
<b:else/>
b:include data='post' name='comments'/>
</b:if>
</b:if>
<b:if cond='data:blog.pageType == &quot;item&quot;'>
<b:if cond='data:post.showThreadedComments'>
<b:include data='post' name='threaded_comments'/>
<b:else/>
<b:include data='post' name='comments'/>
</b:if>
</b:if>
5. Save the Template!

Still getting problem? Share your comment here!

Tuesday, December 11, 2012

How To Put Your Blog Name In "AddThis" Menu?

AddThis is a great social share widget that contains links to over 350+ social media networks where visitors can share your blog post with friends and can also bookmark it. You can in fact customize the  AddThis menu by putting your website name in it and you can also change its background colour. This will help users know that they are using a service you approve of, and this will help encourage more use of this great tool. The more shares your post receives the better the page views.


Adding AddThis Button To Blogger

You can add different styles of add this widgets to your blog by visiting the AddThis website. We later will learn how to put your blog name in it and change the background color. Kindly get your AddThis code and then follow the steps below to add your AddThis button to blogger.
     1. Go To Blogger > Design > Edit HTML
     2. Backup your template
     3. Check the "Expand Widgets Templates" Box
     4. Search for <data:post.body>
     5. To add the AddThis button below post titles then add your addthis code above <data:post.body> else paste it below it so that the button may appear at the bottom of your posts.
     6. Save your template and you are done!


How To Customize The AddThis Menu?

                1. Go To Blogger > Design > Edit HTML
                2. Backup your template
                3. Search for </head>
                4. Just above it, paste the following code,
<script type='text/javascript'>
var addthis_config = {
     ui_cobrand: &quot;BLOGG-TRICKS&quot;,
ui_header_color: &quot;#ffffff&quot;,
     ui_header_background: &quot;#0080FF&quot;
}
</script>
  • Replace BLOGG-TRICKS with your blog name
  • Replace #ffffff with Font Color. Our Color Generator tool can help you.
  • Replace #0080FF with your preferred background color.
               5.  Save your template and see the branded change. Enjoy! :>

Add Sexy Social Sharing Buttons To Blogger

Social networking now accounts for 22% of all time spent online in the US.Many persons are using social media to promote there business, one social share can drive flood of traffic to your blogs.Adding social media buttons to blogger is not a big deal but if you will add eye catching social sharing buttons then it increase chance to get more share on your post.In this post I will give you "Sexy Social Sharing Buttons" which is create with help of pure css3.


Adding Sharing Buttons To Blogger

  • Go To Blogger Dashboard
  • Click Edit HTML > Proceed > Click the Expand Widget Templates Box
  •  Search <data:post.body/>
  • Just below <data:post.body/>  paste the following code
<b:if cond='data:blog.pageType == &quot;item&quot;'>   <div class="sharelordhtml"> <center><div class="headinglordhtml">Like the Post? Do share with your Friends.</div>     <ul class='social' id='cssanimation'>     <li class='facebook'>     <a expr:href='&quot;http://www.facebook.com/share.php?v=4&amp;src=bm&amp;u=&quot; + data:post.url + &quot;&amp;t=&quot; + data:post.title ' onclick='window.open(this.href,&apos;sharer&apos;,&apos;toolbar=0,status=0,width=626,height=436&apos;); return false;' rel='nofollow'><strong>Facebook</strong></a>     </li>     <li class='twitter'>     <a expr:href='&quot;http://twitter.com/home?status=&quot; + data:post.title + &quot; -- &quot; + data:post.url ' rel='nofollow' target='_blank'><strong>Twitter</strong></a>     </li>     <li class='googleplus'> <a expr:href='&quot;https://plusone.google.com/_/+1/confirm?hl=en&amp;url=&quot; + data:post.url' onclick='window.open(this.href,&apos;sharer&apos;,&apos;toolbar=0,status=0,width=626,height=436&apos;); return false;' rel='nofollow' target='_blank'><strong>Google+</strong></a>     </li>     <li class='pinterest'> <a href='javascript:void((function()%7Bvar%20e=document.createElement(&apos;script&apos;);e.setAttribute(&apos;type&apos;,&apos;text/javascript&apos;);e.setAttribute(&apos;charset&apos;,&apos;UTF-8&apos;);e.setAttribute(&apos;src&apos;,&apos;http://assets.pinterest.com/js/pinmarklet.js?r=&apos;+Math.random()*99999999);document.body.appendChild(e)%7D)());' rel='nofollow' target='_blank'><strong>Pinterest</strong></a>     </li>     <li class='stumbleupon'>     <a expr:href='&quot;http://www.stumbleupon.com/submit?url=&quot; + data:post.url + &quot;&amp;title=&quot; + data:post.title ' rel='nofollow' target='_blank'><strong>StumbleUpon</strong></a>     </li>     <li class='delicious'>     <a expr:href='&quot;http://delicious.com/post?url=&quot; + data:post.url + &quot;&amp;title=&quot; + data:post.title ' rel='nofollow' target='_blank'><strong>Delicious</strong></a>     </li>     <li class='linkedin'>     <a expr:href='&quot;http://www.linkedin.com/shareArticle?mini=true&amp;url=&quot; + data:post.url + &quot;&amp;title=&quot; + data:post.title + &quot;&amp;summary=&amp;source=&quot;' rel='nofollow' target='_blank'><strong>LinkedIn</strong></a>     </li>     <li class='reddit'>     <a expr:href='&quot;http://reddit.com/submit?url=&quot; + data:post.url + &quot;&amp;title=&quot; + data:post.title ' rel='nofollow'><strong>Reddit</strong></a>     </li>     <li class='technorati'>     <a expr:href='&quot;http://technorati.com/faves?add=&quot; + data:post.url ' rel='nofollow' target='_blank'><strong>Technorati</strong></a>     </li>     </ul></center></div>   <link href='http://fonts.googleapis.com/css?family=Englebert' rel='stylesheet' type='text/css'/>​ <style> ul.social { list-style:none; display:inline-block; margin:15px auto; }  ul.social li { display:inline; float:left; background-repeat:no-repeat; }  ul.social li a { display:block; width:50px; height:50px; padding-right:10px; position:relative; text-decoration:none; }  ul.social li a strong { font-weight:400; position:absolute; left:20px; top:-1px; color:#fff; z-index:9999; text-shadow:1px 1px 0 rgba(0,0,0,0.75); background-color:rgba(0,0,0,0.7); -moz-border-radius:3px; -moz-box-shadow:0 0 5px rgba(0,0,0,0.5); -webkit-border-radius:3px; -webkit-box-shadow:0 0 5px rgba(0,0,0,0.5); border-radius:3px; box-shadow:0 0 5px rgba(0,0,0,0.5); padding:3px; }  ul.social li.facebook { background-image:url(https://blogger.googleusercontent.com/img/b/R29vZ2xl/AVvXsEh-sa-s0QhKCod4HCGruIpZu2lucPkFGQCU4_q8IsnQaBSl1rPSAPu1C4XjmUa6OZZp59l_CVemH0cY89jXMhurHOngUAW7pu_mmwdB8TfQQYhEmLUheoxwkayrX9kc5j52VVrD1salGHc/s50/facebook.png); }  ul.social li.twitter { background-image:url(https://blogger.googleusercontent.com/img/b/R29vZ2xl/AVvXsEhXS-qN7ZbFT6xnaEd-nHeufs0BGSesQmzZewqjj4Ru4ZJP8pQcFXhJ6ZWSFEL4VB98q4EN3Gx8LWWgiGMFuNzoToFPa1mMVppkdtQaPJvSvawsN_X7KewkjJDTM312fUtx6ezxH1DIdvY/s50/twitter.png); }  ul.social li.googleplus { background-image:url(https://blogger.googleusercontent.com/img/b/R29vZ2xl/AVvXsEiohyiTMS205Rt9VY4CIh2fwT2pU7NXzizwzvhjliyuHNJ4awteb7f-qPl8RMatcPyS9LGBHzOQ1nBtufqvUKzscyJqb2Gwho6uZ-BMD3nloWL7HaZO-KuFMPFp_UbueLY4eVBMqzZSM1U/s50/google%252B.png); }  ul li.pinterest { background-image: url(https://blogger.googleusercontent.com/img/b/R29vZ2xl/AVvXsEg400GW4DTt4t1-_UUShIBPgHtSl_pqcXlu19XgO6peERbzGgylAHH3FtAOSo7JAqtWVAhfWH8mtAAZkCTeRl8qBYB5VOJl-r5LZZWTsjo4c5D5ASQUr8T16yBSrU-18RVDzMeLRO0ZpZc/s50/pinterest.png); }  ul.social li.stumbleupon { background-image:url(https://blogger.googleusercontent.com/img/b/R29vZ2xl/AVvXsEiwdieW6PQS4y0o7WonmFnZFARUFoPAvgJjjmslLCdJfVlYWtBx3N1FpXE0uASOzmvavKVBGb3cu4xSrMcOwUfIQ1wqvF84sBQ-dTedBVswzu3aQEQlpd0jfqcuAn0huwkRSzwQvzvd1hw/s50/stumbleupon.png); }  ul.social li.delicious { background-image:url(https://blogger.googleusercontent.com/img/b/R29vZ2xl/AVvXsEijVunZkiK7sb89JR3vTjSltjj6J-fg8TcG0x2GCEbmVHLYKWO_IiRXP2avNlidU_nYqpLey_vC1BeHp2JAis8vnFIYVZ0w8zQpQ6Zs-8GDZ0x03jpYgfFyJeEm2JSZDfGGH9YN3-5vWYk/s50/delicious.png); }  ul.social li.linkedin { background-image:url(https://blogger.googleusercontent.com/img/b/R29vZ2xl/AVvXsEhaAnnxr35McAuiAtceF3_LCAikFz50I8MXj2M187hYU5g6PGQynpGfBCSfN2py9TYjvyaV5HiBTswWelNG62fIF-_tMlMRA2SvI-pcqg-De-LJV57WGK_UhswiqHJFOMZtSH9KzQl5ZyU/s50/linkedin.png); }  ul.social li.reddit { background-image:url(https://blogger.googleusercontent.com/img/b/R29vZ2xl/AVvXsEjIDcN8OsPx37pqxOra68R1a1Vr36b6bBGt5ispyA6kcoT8sPe_zaSYJoXndPmRkcjsU51mNQ3tPo9RrEAYsCsyO5FrieQNLoxyPVHgZtr8C8kf5Fp3QQO7hkT5SxEGlEmXXVxemkMEJP0/s50/reddit.png); }  ul.social li.technorati { background-image:url(https://blogger.googleusercontent.com/img/b/R29vZ2xl/AVvXsEgtF5q_JbEh3DMEW7dvyF9Lol2mxJHrqNyPHUr39bqjZTO19nEmVq-W05EOfyQXmPY0JK6IUPX7njc9Qc5HpghxhJRs5uUbV5bxhD6OnRPi1hGmzQAZT2ged5KV-0friy-uEfpoVNsg0mas/s1600/TBI-technorati.png); }  #cssanimation:hover li { opacity:0.2; }  #cssanimation li { -webkit-transition-property:opacity; -webkit-transition-duration:500ms; -moz-transition-property:opacity; -moz-transition-duration:500ms; }  #cssanimation li a strong { opacity:0; -webkit-transition-property:opacity, top; -webkit-transition-duration:300ms; -moz-transition-property:opacity, top; -moz-transition-duration:300ms; }  #cssanimation li:hover { opacity:1; }  #cssanimation li:hover a strong { opacity:1; top:-10px; } .headinglordhtml{     font-size:25px;     font-family: 'Englebert', sans-serif; } .sharelordhtml{   border-top:30px solid #3873CC;      padding:16px;         -webkit-box-shadow: 0px 7px 9px rgba(50, 50, 50, 0.75); -moz-box-shadow:    0px 7px 9px rgba(50, 50, 50, 0.75); box-shadow:         0px 7px 9px rgba(50, 50, 50, 0.75);     transition: background .777s; -webkit-transition: background .777s; -moz-transition:background .777s; -o-transition: background .777s; -ms-transition: background .777s;     background:#D9D6FF; }  .sharelordhtml:hover {         background:white;  }  ​ </style>  </b:if>

  • Now Click On Save Template Button And Enjoy This Awesome Widget.
If you have any problems tell me in the comments.

Sunday, December 9, 2012

How to Add Retweet Button to your Blogger Posts

Since Twitter is getting huge popularity these days, adding a cool Retweet Button to your Blogger blog posts can easily get you some decent amount of traffic and promote your content/products to large people in quick time. If you have tons of followers, then you can easily milk it.. ;)

So, here is how to add a nice Retweet button to your blogspot blog posts:

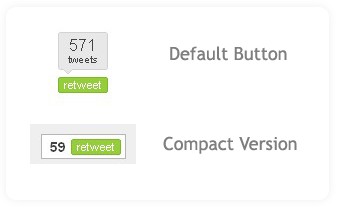
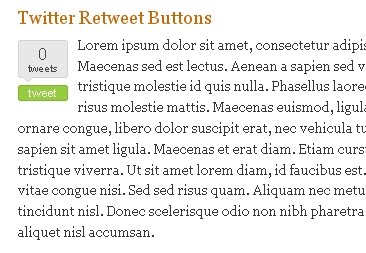
There are two versions of retweet buttons.. one is the default one (looks like digg button) and the other one is Compact version which can fit in small space..

twitter retweet button for blogger


The Code for the Default version is :


<script type="text/javascript">
tweetmeme_url = '<data:post.url/>';
</script>
<script type="text/javascript" src="http://tweetmeme.com/i/scripts/button.js"> </script>

and for Compact version is :


<script type="text/javascript">
tweetmeme_style = "compact";
</script>
<script type="text/javascript" src="http://tweetmeme.com/i/scripts/button.js"></script>


Here is how to add them to your blogger post..

If you want it to the left side of blog post..

twitter retweet button aligning left

Find


<data:post.body/>

And Paste this code BEFORE that line..


<div style="float:left;padding: 6px 10px 6px 0px;">
<script type="text/javascript">
tweetmeme_url = '<data:post.url/>';
</script>
<script type="text/javascript" src="http://tweetmeme.com/i/scripts/button.js"> </script>
</div>

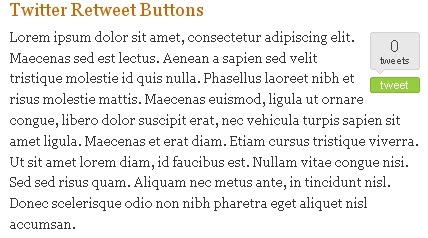
If you want it to the Right Side of post..

adding retweet button on the right side of blog post

Find


<data:post.body/>

Add this code BEFORE that line..


<div style="float:right;padding: 6px 0px 6px 6px;">
<script type="text/javascript">
tweetmeme_url = '<data:post.url/>';
</script>
<script type="text/javascript" src="http://tweetmeme.com/i/scripts/button.js"> </script>
</div>


Note: In the above two cases, if you want Compact button instead of default style, Just simple replace the default style code with compact one (refer step 1)

Finally SAVE THE CHANGES!

How to add Blogger Share Buttons to Custom Blogger Templates

Recently, Blogger released their new Share Buttons feature which makes it easier for your Blog visitors to bookmark, tweet, fshare, email ,etc your post.

But, if you're using any custom blogger template.. you may not see the widget appearing in blog..even though you activate it.

So, if you have that problem. here is how to fix it.
(before making any changes..first backup your template)

1. Sign into Blogger > Design > Edit html
(tick the expand widget templates)

2. Add this line anywhere you want the widget to appear

<b:include data='post' name='shareButtons'/>


Normally, in most templates, you can add it after this line..

<p class='post-footer-line post-footer-line-1'>


If you don't find that above line in your template....
Find this one.

<p><data:post.body/></p>
 
and add this code after that line..

<p><data:post.body/></p>
<div style='clear:both; padding: 10px 10px 10px 10px;'> <b:include data='post' name='shareButtons'/> </div>


Note: If you're using Magazine style blogger template, You can find the data:post.body line TWO TIMES.. So, try in both ways and find out which one is working..and remove the other one.

Finally..Save the template!

If you still don't see it in your Blog, Make sure..you activated it by going to
Blogger dashboard > Design > Click the 'edit' button of the Blog post section.


Saturday, December 8, 2012

Create Blogger Backup For Images And Get Image URLs

Many bloggers including some professional ones suggest to store Blogger images on services like www.Photobucket.com , www.tinypic.com etc. but I really don’t understand why would someone do that when one has unlimited Image storage and bandwidth inside Picasa web albums that is where Blogger saves all your images. Well its time to change the way people use Blogger and we are here to let you help make better use of resources available to you.


Today I will share a different way of managing all your images in blogger by letting you know how to create a Backup for all your images and we will also learn how to get Unique URLs for images. This tutorial will also help you in reducing your blog load time by 40% i.e 150-200kb
To create an Image Backup you will need to do the following,

  • Go To Blogger
  • Create a draft Post and name it Backup For Images
  • Now start uploading all your images to blogger using the normal method. These images can be images that you have saved elsewhere and have link to it in your blogger template. For example: Background Image, Sidebar Headers, Icons, Header Background etc. If you scan your template you will find many image URLs inside the CSS part that starts from <b:skin> and ends at </b:skin>. An image URL/link can end as .gif  | .png  |  .jpeg   |  .bmp etc. Open each URL/link in your browser and save the image in your Hard Drive by right clicking on it and then choosing “Save Image As”
  • Once you have uploaded all your images, your backup will look like that of mine,
BACKUP FOR IMAGES

  • Now Comes the interesting part. In order to get Image URLs and use them somewhere inside your blog template or sidebar widgets, you will need to do the following,

      Make sure you are using Firefox Browser Click the Preview Link at the top-right corner of your Backup post
    Preview-link
    Once the images are displayed below the draft post, simply right click on your desired image and then choose “Copy Image Location”
      Copy-Image-Location
    Now paste this Image URL inside your Browser Address bar,
Paste-Image-URL-in-Browser-
  • Your Image URL will look something like the one below,
http://4.bp.blogspot.com/_7wIwo/Spr1Lxjk6I/AABu0/uS0zY4/s400/MyBloggerTricks.jpg
The important part in this link is s400 . If you want the image to appear in full size then change s400 to s1600 . The image will appear in its original size.
Now this is how I store all my images and get their unique URLs. This way you will never loose images. By adding such image URLs to your blogger templates, you will observe a significant decrease in the load time of your blog.